Execute Build Pipeline
Update the catalog_rhel.json file and execute the BuildStreaM build pipeline through GitLab. This procedure covers catalog modifications, pipeline triggering (automatic and manual), and verification of pipeline status.
Overview
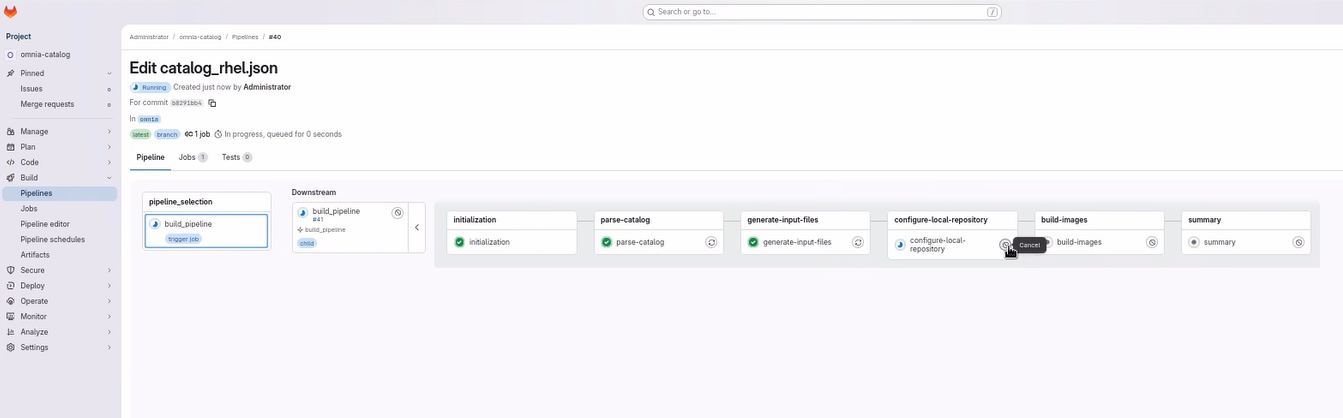
The BuildStreaM build pipeline automates the creation of diskless images based on catalog specifications. The pipeline consists of four sequential stages:
- parse-catalog: Parses and validates the catalog file for build requirements
- generate-input-files: Generates input files and configuration data for image building
- create-local-repository: Creates and configures the local repository for build artifacts
- build-image: Builds the diskless images based on catalog specifications
The build pipeline is automatically triggered when you update the catalog_rhel.json file in the GitLab repository, or can be manually initiated through the GitLab interface.
Warning
Do not cancel a running GitLab pipeline or stage. Cancellation prevents some pipeline steps from executing, which leaves the BuildStreaM job in an intermediate, inconsistent state.
Note
BuildStreaM does not support execution of multiple pipelines in parallel. Only one pipeline can be executed at a time. Attempting to run multiple pipelines simultaneously may result in unexpected behavior or failures.
Note
BuildStreaM does not support execution of multiple pipelines in parallel. Only one pipeline can be executed at a time.
Prerequisites
- BuildStreaM container is deployed on the OIM node
- GitLab deployment for BuildStreaM is completed (see Deploy GitLab)
- You can access the GitLab project repository
Procedure
Trigger Build Pipeline Automatically
-
Go to the GitLab project URL:
GitLab project URLhttps://<gitlab_host>:<gitlab_https_port>/root/<gitlab_project_name> -
Navigate to Code → Repository.
-
Locate the catalog file
catalog_rhel.json. -
Modify the
catalog_rhel.jsonfile to define your build requirements.Caution
Ensure that the
software_config.jsonfile contains all required inputs for the software to be deployed on each functional group.Note
Ensure that the catalog file is updated with valid values. The pipeline fails if invalid details are provided.
Supported values:
- Functional group names:
slurm_control_node_x86_64,slurm_node_x86_64,slurm_node_aarch64,service_kube_control_plane_x86_64,service_kube_node_x86_64,login_node_x86_64,login_node_aarch64,login_compiler_node_x86_64,login_compiler_node_aarch64,os_x86_64,os_aarch64 - Architecture type:
x86_64andaarch64 - OS type:
RHEL - OS version:
10.0 - Package types:
rpm,rpm_repo,image,iso,tarball,pip_module,git,manifest
- Functional group names:
-
Commit the catalog changes. The pipeline triggers automatically.
-
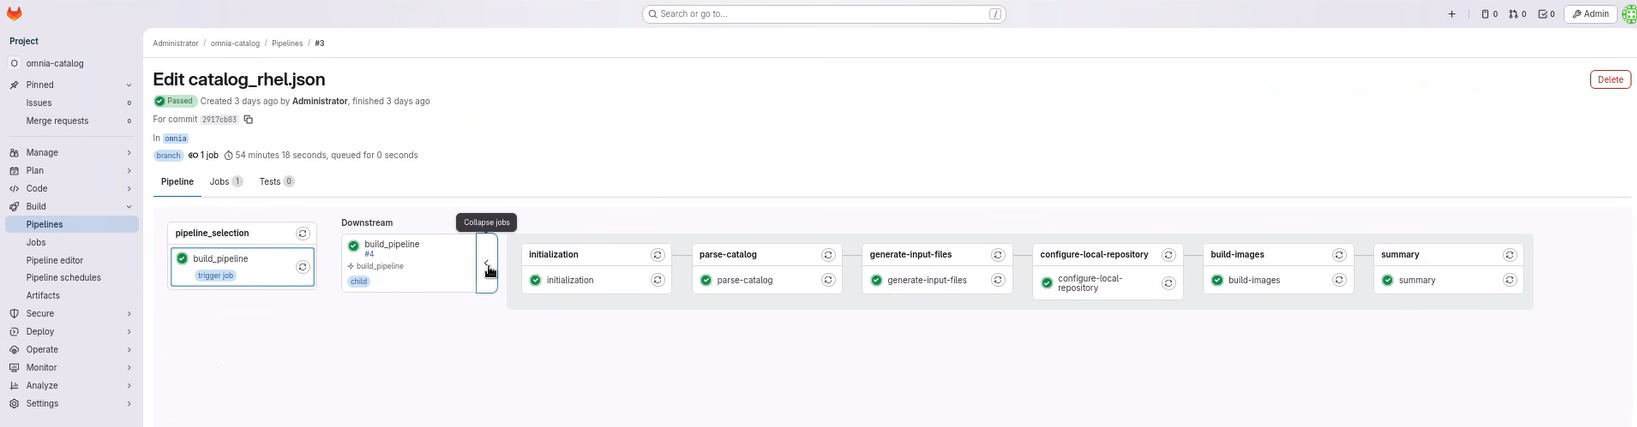
Monitor the pipeline progress.
Trigger Build Pipeline Manually
-
Navigate to Build → Pipelines.
-
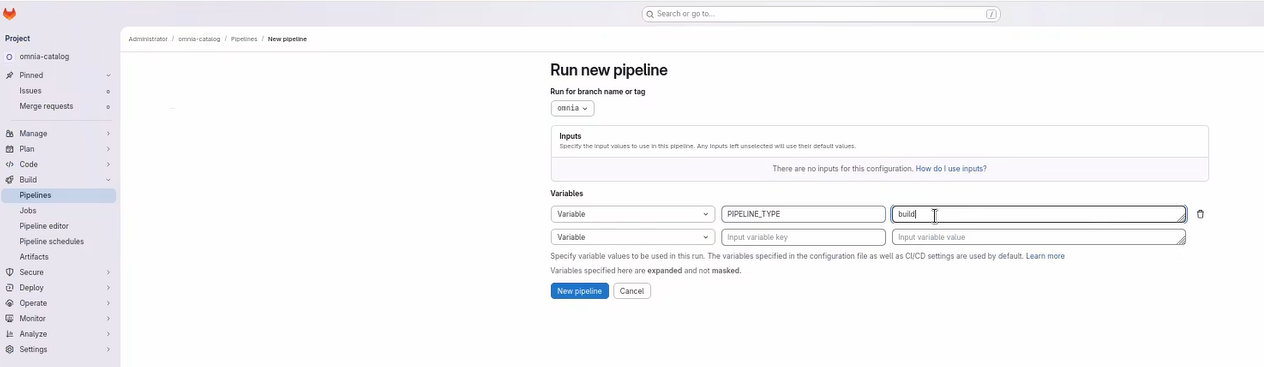
Click New Pipeline.
-
In the Run new pipeline dialog box, enter the variable name as PIPELINE_TYPE and enter the value as build.
-
Click Run Pipeline to execute the build pipeline.
Monitor Build Pipeline Progress
-
Navigate to Build → Pipelines.
-
Click on the running pipeline to view details.
-
Monitor each stage as it progresses:
- parse-catalog: Parses and validates the catalog file
- create-local-repository: Creates and configures the local repository
- generate-input-files: Generates input files for image building
- build-image: Builds the diskless images
-
Review the stage status indicators:
- Green checkmark: Stage completed successfully
- Red X: Stage failed (click for error details)
- Blue circle: Stage currently running
-
If any stage fails, review the error logs by clicking on the failed job.
Update Input Configuration Files
To update the input configuration files before a manual build:
-
Navigate to the
input/folder in the GitLab repository. -
Edit the relevant configuration file.
-
Commit and push the changes.
Verification
After the pipeline completes:
-
Navigate to Build → Pipelines.
-
Review the job list and status.
-
Click on individual jobs to view execution logs, resource usage, and error messages.
Next Steps
- Execute Deploy Pipeline -- Deploy the built images to cluster nodes
- Cleanup Operations -- Remove old Image Groups
Troubleshooting
- Parse-Catalog stage failing: Ensure the JSON is aligned with the expected schema. See catalog examples at https://github.com/dell/omnia/tree/pub/build_stream/examples/catalog.
- Create-Local-Repo stage failing: Check the log path from the API response and verify
local_repo_config.ymlsettings. - Build-Image stage failing: Ensure the catalog has valid functional groups.
- For additional issues, see BuildStreaM Troubleshooting.