Deploy GitLab for BuildStreaM
Deploy GitLab as the CI/CD automation engine for BuildStreaM pipelines. This procedure covers GitLab installation, project setup, pipeline configuration, and runner verification.
Overview
BuildStreaM uses a three-pipeline architecture in GitLab:
- Build Pipeline: Triggered by catalog changes, creates images and establishes Job ID to Image Group ID mapping. Can also be executed manually.
- Deploy Pipeline: Triggered by PXE mapping changes, deploys images to cluster nodes. Can also be executed manually.
- Cleanup Pipeline: Triggered manually, allows users to delete selected Image Groups.
Prerequisites
- Omnia BuildStreaM container, PostgreSQL container, and Playbook Watcher service are deployed on the OIM node
- The node where GitLab will be deployed must have internet connectivity
- A dedicated node is required for BuildStreaM GitLab deployment
- Minimum 4 GB RAM, 2 CPU cores, 20 GB free disk space on the GitLab node
- OIM node must be accessible from the GitLab node
- BuildStreaM API server must be reachable from the GitLab node
- AppStream and Base OS repositories are configured and accessible from the GitLab node
- SELinux is disabled on the GitLab node
Important
Omnia uses a dedicated GitLab instance for BuildStreaM. Currently, existing GitLab setups configured for other purposes are not supported.
Note
Ensure that the build_stream_port is correctly configured in the build_stream_config.yml file. The BuildStreaM port cannot be modified after preparing the OIM. To modify the port after preparing the OIM, you need to cleanup the OIM first (using cleanup_oim.yml), and then prepare the OIM again with the required port number (using prepare_oim.yml).
Procedure
-
Use SSH to connect to the
omnia_corecontainer:Run on: OIM hostssh omnia_core -
Update the
gitlab_config.ymlfile. Use the GitLab configuration table for reference.Run on: omnia_core containervi /opt/omnia/input/project_default/gitlab_config.yml
Caution
Ensure that all network ranges and NIC IP addresses provided in the configuration files are distinct with no overlap. All iDRACs must be reachable from the OIM.
-
Navigate to the GitLab directory and run the playbook:
Run on: omnia_core containercd /omnia/gitlab ansible-playbook gitlab.yml -
When prompted, enter the GitLab password. Note this password as it is required to access the GitLab project and instance.
Note
The installation may take 10-15 minutes to complete.
The
gitlab.ymlplaybook performs the following tasks:- Installs the GitLab instance on the host specified in
gitlab_config.yml. - Creates a project with the specified name, visibility, and default branch.
- Installs GitLab runner as a Podman container.
- Generates a self-signed CA certificate at
/root/gitlab-certs/ca.crton the GitLab node. - Adds the project with the following files:
- Pipeline Configuration Files:
.gitlab-ci.yml-- Parent router pipeline that dispatches to child pipelines.gitlab-ci-build.yml-- Build pipeline for creating images.gitlab-ci-deploy.yml-- Deploy pipeline for deploying images to nodes.gitlab-ci-cleanup.yml-- Cleanup pipeline for removing old Image Groups.gitlab-ci-deploy-child-template.yml-- Dynamic child pipeline template for deploy operations
- Catalog File:
catalog_rhel.json-- Default catalog file containing build definitions for RHEL images
- Input Folder:
input/-- Directory containing all BuildStreaM input configuration files
- Pipeline Configuration Files:
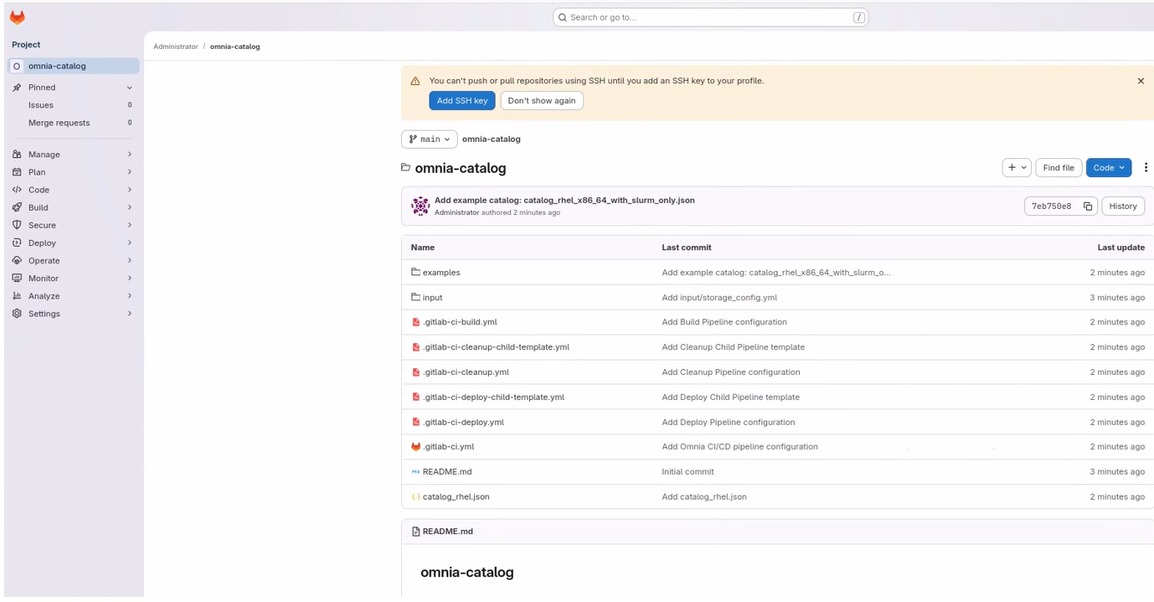
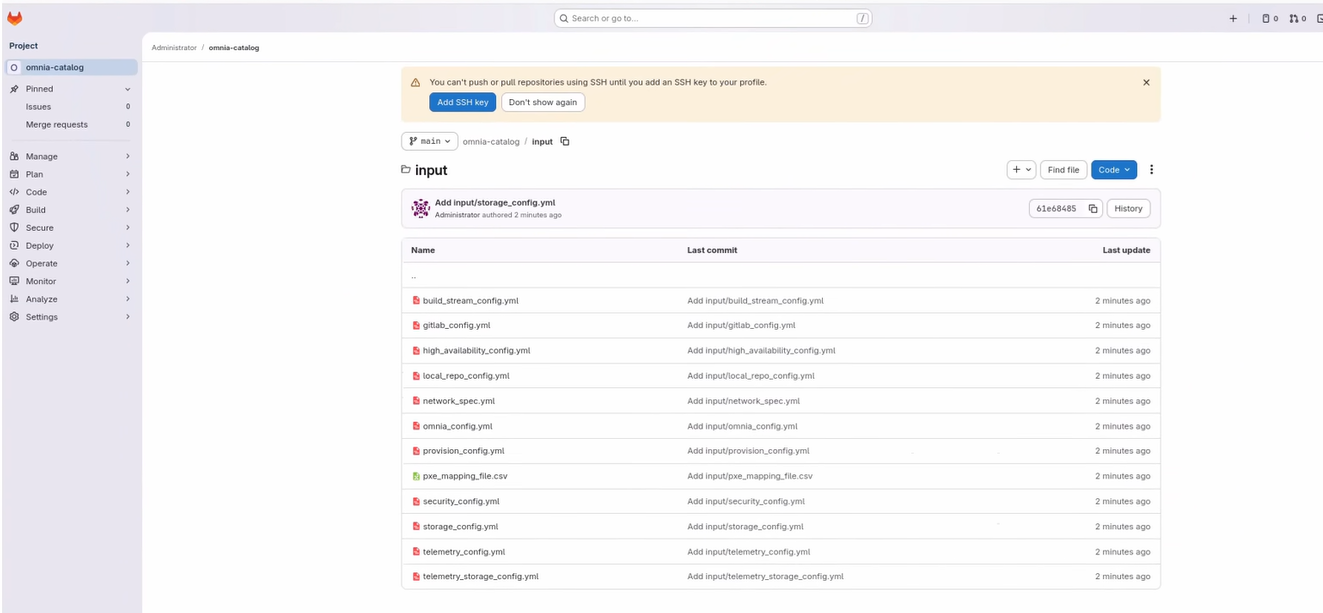
The input folder includes the following configuration files:
build_stream_config.yml-- BuildStreaM configuration filegitlab_config.yml-- GitLab configuration filehigh_availability_config.yml-- High availability configuration filelocal_repo_config.yml-- Local repository configuration filenetwork_spec.yml-- Network configuration fileomnia_config.yml-- Omnia configuration fileprovision_config.yml-- Provision configuration filepxe_mapping_file.csv-- PXE mapping filesecurity_config.yml-- Security configuration filestorage_config.yml-- Storage configuration filetelemetry_config.yml-- Telemetry configuration filetelemetry_storage_config.yml-- Telemetry storage configuration file
- Installs the GitLab instance on the host specified in
-
To avoid Not Secure warnings when accessing the GitLab instance, download and import the CA certificate to your browser.
Verification
After the installation completes, verify the following:
-
Verify you can access the GitLab project URL:
GitLab project URLhttps://<gitlab_host>:<gitlab_https_port>/root/<gitlab_project_name> -
Verify the project contains the expected files and folders.
-
Verify runner status through GitLab web interface:
- Navigate to Settings → CI/CD.
- Expand Runners section.
- Verify the runner shows a green status indicator.
- Confirm runner is set to Running Always with **Podman Container`.
Note
The omnia_build_stream.service, omnia_postgres.service, and playbook_watcher.service run only when BuildStreaM is enabled in /opt/omnia/input/project_default/build_stream_config.yml.
Next Steps
- Execute Build Pipeline -- Update catalog and trigger the build pipeline
- Execute Deploy Pipeline -- Deploy built images to cluster nodes
- Cleanup Operations -- Remove old Image Groups
Uninstall GitLab
To remove the GitLab instance and associated resources from the BuildStreaM environment:
-
Use SSH to connect to the
omnia_corecontainer:Run on: OIM hostssh omnia_core -
Navigate to the GitLab directory and run the uninstall playbook:
Run on: omnia_core containercd /omnia/gitlab ansible-playbook cleanup_gitlab.yml
Caution
This procedure permanently removes the GitLab instance, all projects, pipelines, and build artifacts. Ensure you have backed up any required data before proceeding.
The cleanup_gitlab.yml playbook performs the following tasks:
- Stops and removes the GitLab runner Podman container
- Removes the GitLab project
- Uninstalls the GitLab instance from the host
- Removes the self-signed CA certificate from
/root/gitlab-certs/ - Cleans up GitLab-related configuration files
Troubleshooting
- GitLab not accessible: Verify network connectivity between OIM and GitLab node. Check that the port specified in
gitlab_config.ymlis not blocked by firewall. - Runner not running: Check runner status in GitLab UI under Settings → CI/CD → Runners. Verify the Podman container is running on the GitLab node.
- SSH omnia_core fails after prepare_oim: If
ssh omnia_corefails after switching from a non-root to root user usingsudo, log in directly as arootuser before executing the playbook. See General Troubleshooting for details. - For additional issues, see BuildStreaM Troubleshooting.